skip to main |
skip to sidebar
It must be the week for discovering cool new things. Today I discovered the awesomeness of the Plotter - a type of printer traditionally used to print architectural plans. It differs from a normal printer in that it uses a mechanical arm with a pen attached to draw lines and colour in fills, much like a human does. But why is it so cool? Because it's CHEAP, that's why! I got two A0 size prints done (841mm × 1189mm) for $4.40 each! That's crazy cheap in my mind. I'm using the prints to get a sense of the scale of my patterns before they go onto fabric:
 'geese' and 'japanese garden' - any suggestions for better names? Hehe.
On a side note, the other day I frightened a poor woman who was walking down the street when I shouted out and pointed at her - she was wearing one of my blue dot necklaces! I couldn't help it - I've never come across a stranger wearing my stuff before and it was a reflex reaction. She'd bought it from our local giftwares shop, so it's not as coincidental as someone who'd bought it off the net. But still.
Wow it's been quite awhile since my last blog post. Most of my spare energy has been directed towards organising my next print run of fabric, which will hopefully be finished by the end of next week or the week after - my printer is really busy at the moment, which is a shame.
I've also been trying to come up with some new pattern designs but haven't been happy with the result. Maybe I've subconciously moved the bar up too high due to recent successes. I want my next pair of printed fabric designs to be just perfect. The right mix of unique + fun + nature-ee + modern + retro-ee :)
A few people have asked me recently if it's okay for them to use my fabric to make things which they then on-sell. My answer is simple - definately! In my mind that's the ideal use for it. I'd love to see my fabric made into real things that can then be sold on to happy customers. I'd make things with it myself if I had a more reliable sewing machine. That said, the first thing I did when I received my fabric was make it into some lampshades. The yellow works particuarly well as a lampshade because the colour isn't too strong and provides just the right amount of contrast when the lamp is on:

 Take care and thanks again for all the support and very lovely comments!
I haven't mentioned anything for a couple of weeks but the fabric printing is going ahead as we speak! It's due to be finished early next week and I am _so_ excited. And nervous. But mainly excited. Below are the four pattern and colourway options that will be available. The bottom design was a big favourite in the poll a few weeks ago, however the top one got hardly any votes at all (i reckon you have to see it printed to get the full effect). But it was the lovely Jenny from Amitie Textiles that helped pursuade me on that one, saying it was her favourite and offering to buy 10m of it for her shop. Yay!
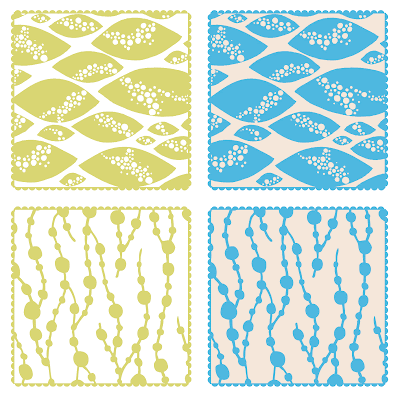
(each square represents about 22cm squared)
Also i'd like to send a BIG thankyou to Krisen Doran who's been such a great help along the way, giving me heaps of advice on the process and being a great sounding board :)
Although I've done some weird and wonderful things with my Gocco, i've never actually done a plain old proper run of cards. So I decided to Gocco print my xmas cards this year, but they were a bit of a disaster colour wise.
The problem all started when I absent mindedly squeezed out too much blue ink onto the mixing palette. Not wanting to waste it I tried to make a green out of it anyway by adding not-enough-yellow. The end result being that really gross middle-green colour that looks completely boring coupled with plain old red. See below left: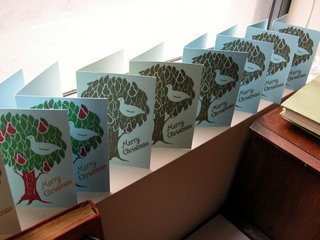 The project was partly rescued by scraping off all the ink, mixing it together to form a muddled greeny brown colour, and printing the design 1 colour:
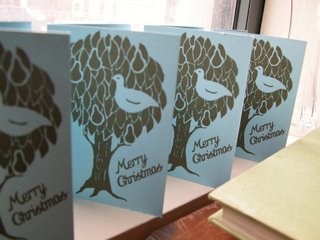 Oh, it's supposed to be a partidge in a pear tree... if it's not obvious :)
As the title of this post suggests, not all my printing experienced this week have been woeful. Sometimes it's better to leave things to the professionals, like my favourite printers ImageScience, who specialise in high quality inkjet prints onto lovely archival cotton papers and canvas (and happen to be across the road!).
I had a bit of leftover canvas real-estate from another job with which I printed these: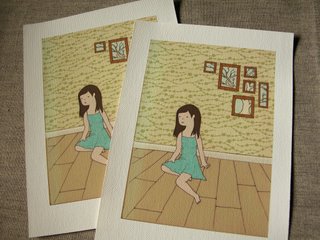 I'm thinking of putting them up on Etsy and seeing how they go. I have no idea how much I'd try to sell them for though. They're 11cm x 16cm plus the white border. Any suggestions welcome!!
 Well, that's all from me for now. Hope everyone is on top of their xmas shopping and not too stressed out, and I hope you all have a fantastic christmas and new year!! I'll be back in the new year hopefully with some new patterns and projects and fun stuffs! xo
I was reading Loobylu the other day and she mentioned that November is National Blog Posting Month (NaBloPoMo) - where for the whole of this month you post something every day. I woke up this morning and realised that I have inadvertently done just that. Problem is, I don't think I can keep it up. The fact of the matter is that I'm just not a good writer, and am painfully self concious of this fact at times. I'm also quite crap at coming up with names for things like blog posts, pattern designs and my jewellery. I read other blogs full of smooth, witty lines that make their day to day activites much more engaging, but when I write about mine, they just sound mundane. That said, not be self defeatist I'm going to make an effort.
I spent most of yesterday making birthday presents for one of my closest friends. When looking for wrapping paper I found one of my patterns printed on a sheet of A3 that I got Pete to sneakily run off at work.
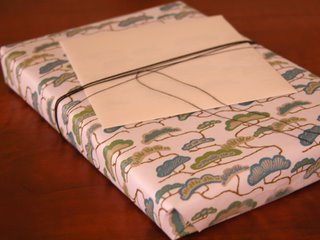
I'm starting to learn the lesson that a mockup speaks a thousand pictures :) The pattern looks so much better in context rather than as a flat graphic.
I know I've posted a demonstration of this before, but since my shiny new Gocco 'Stamp' came in the mail, I've found a much nicer, cleaner way to print properly aligned pattern repeats onto fabric + paper. And it's good to show the Stamp in action too. Contrary to my previous posts, it is actually a very handy tool to have.
 Here's mister Stamp.
 The stamp has a spongey base that's slightly sticky, so your screen sticks to it. The design on the screen is a pattern tile that interlocks with itself, to form an endlessly repeating pattern.
 Here's my piece of paper with a couple of prints already on it. Sitting on top is my polyprop 'registration plate' with the design printed on it also. The registration plate is cut to be the same size/shape as my B6 screen, (plus a little bit extra at the top and bottom - i'll explain that later). The print onto the registration plate was done with the plate+screen perfectly aligned.
 Okay so here's the stamp sitting on the paper, or should I say above the paper. The curved clippy things on the side make it so the screen 'floats' there until you push it down. Directly underneath the stamp is my registration plate. The top and bottom of the plate line up with the clippy things because of that extra little bit of height I added.
 Once the registration plate is slid out from underneath, Stamp! My hand looks weird and huuuge in this shot!
 The final print. The alignment is much better than my previous method - yay :)
For anyone wanting to print free of the Gocco machine I highly recommend the Stamp. You can get with or without the 'Stamp Kit for Cloth', nice and cheaply from Welsh Products for $36.50 USD. They're not sold anywhere in Australia unfortunately.
Hope this comes in handy for someone out there :)
Two posts in two days! I haven't done that in ages. Holiday mode has definately started early around here - I spent almost all of yesterday doing crafty stuff. I felt guilty to be doing it during "work hours", but really... if I plan to make a business out of selling jewellery etc then this IS work. It doesn't feel like it though!
Yesterday was spent printing one of my patterns onto sheets of A4 paper - using a repeating-pattern-tile Gocco screen. This screen turned out heaps better than my previous ones. I think because this time, after the flash went off, I remembered to keep holding down for 5 seconds. This lets the heat transfer a bit longer and burns a better screen.


Damn, that was a lot of work, but definately worth it! These sheets will become packaging for my earrings etc.
Oh, I also discovered something cool for any PG-11 owners out there. If you want to be able to stamp your design onto surfaces outside of the machine, you don't have to buy the Stamp Kit for Cloth (although I've ordered mine already, bugger). All you need to do is release the stamp pad from the machine - it has a simple spring release if you detach it from the right hand side first. Ink up your screen as usual, place it down onto whatever surface u want to print on, and then push down on it with the stamp pad. It's basically the same as printing inside the machine, just upside-down! You might be able to do this with the other Gocco models, i'm not sure.
Have a great weekend :)
Today is a better day - I had a client meeting that went really well. We went to the cafe 'Journal' at the City Library which I really like - it has large communal tables which are good for meetings with a laptop. I am starting to feel back on top of things, yay.
I got a reply from the digital fabric printing place. Lengths of 1-5 metres (140cm wide) costs $100 (AUD). Preedy expensive, but I was expecting that. So hmmm, what to do, what to do. I can't exactly sell yardage at prices like that, so maybe this would be a venture more suited to printing packaging for jewelry and what not. Or perhaps I need to investigate the screen printing option further... any thoughts/suggestions out there?
I couldn't very well make a post without including a picture. So here's a little diagram I made recently about how to make a pattern repeating tile in illustrator:

Today I figured out how to print my Gocco pattern "tile" in multiple repeats, using a home made registration plate. In case anybody's interested, I thought I might document the process. Here it is!
 My home made registration plate, made out of some polypropylene from the art store. It's the same size as a Gocco screen, but you'll notice I've cut an indent out of the top edge, leaving two little tabs sticking up at either end.
When printing onto this plate, I made sure that it's edges were lined up with the edges of the screen. None of this printing is done using the actual Gocco machine by the way... just my modified squeegee method - I'll explain that later. Okay so here's the registration plate positioned carefully on the paper so that it continues the pattern. (I'd already done a few tiles at this point before I decided to take photos).
 Here's a delicate bit - the edge of the screen is placed down on the paper so that it's touching the top edge of the registration plate (being careful not to bump the plate).The two little tabs sticking out of the top of the registration plate sort of fit under the curved corners of the screen.
 The registration plate is removed, and the screen is slowly lowered down onto the paper (being careful not to let it slip around). The indent cut out of the registration plate means that when lowering the screen from a standing position, it lands exactly where the registration plate was, rather than slightly higher.
To perform the print outside of the machine, I ink up the screen as normal, cover it with the transparent film, and use a hard piece of plastic to squeegee the ink back and forth. Probably not very "screen friendly" but it's the only way I can think of. Other suggestions are welcome!
 The final product. Not perfect, but I suppose that just adds character :)


